This one takes two days, but most of it is hands-off. A sweet stiff starter gives the dough real body without any sourness, and the instant coffee is there to deepen the chocolate, not to add a coffee flavor of its own.
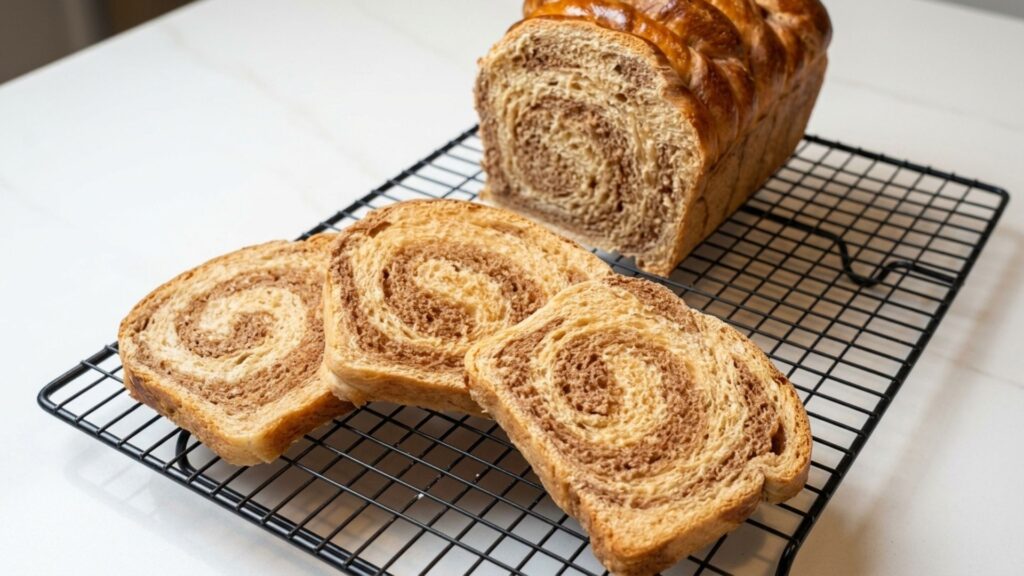
I roll two doughs, stack them, then braid before rolling the whole thing into a log. It looks more complicated sliced than it actually is to make.
In This Post
Why a Sweet Stiff Starter
A regular starter would fight the chocolate here, it's built for tang and this dough doesn't want any. A sweet stiff starter is lower hydration and has sugar mixed in from the start, so it feeds the rise without adding sourness. It's the same logic behind my Matcha Cinnamon Rolls, just dialed further toward a clean, rich brioche crumb.
It also takes longer to peak than a regular starter. Less water means less microbial activity, so give it the full 5-6 hours rather than rushing it.
Ingredients
Sweet Stiff Starter
- 30g active sourdough starter
- 90g strong flour
- 40ml water
- 12g sugar
Dough
- 280g strong flour
- 40g brown sugar
- 115g coconut milk (or regular milk)
- 60g cooking cream
- 1 egg
- 35g softened butter (or neutral/mild olive oil)
- 6g salt
- Vanilla paste, to taste
Chocolate Paste
- 1 tbsp cocoa powder
- 1-2 tsp instant coffee
- 1 tbsp warm water
Swap it: any neutral oil or mild olive oil works in place of the butter, coconut oil is also fine. Any sweetener works in place of the brown sugar too, date paste is a good swap if that's what you have.
Method
Day 1
- Mix the starter ingredients into a tight ball. Let it rise until tripled and puffy, about 5-6 hours in a warm spot.
- In a stand mixer, combine the active starter with the flour, sugar, salt, milk, vanilla, cream, and egg. Mix on low until no dry flour remains.
- Turn to medium speed and add the softened butter gradually, piece by piece. Knead until smooth and elastic, it should pass the windowpane test.
- Divide the dough in half. Keep one half plain. Knead the chocolate paste into the other half until fully incorporated and evenly colored.
- Place both doughs in separate oiled bowls, covered, in a warm spot for 2-3 hours to start the rise, with 2 sets of folds during that window. Refrigerate both overnight.
Day 2
- Roll both chilled doughs into rectangles, roughly 30x40cm each. Stack the chocolate sheet on top of the plain one and press with a rolling pin to pop any air bubbles.
- Cut the stacked dough into 6 equal strips. Slit down the center of each strip and pull the end through the opening 3 times to form a braid, then roll the strip into a log, keeping the braid on top.
- Place in the loaf pan, cover, and proof at room temperature 2-3 hours, until the dough puffs up and reaches the rim of the pan.
- Brush with egg wash, 1 egg beaten with a splash of milk.
- Bake at 180°C (355°F) for 35-40 minutes, non-ventilated.
- Cool completely in the pan before slicing.
Getting the Braid Pattern
The pattern comes entirely from the slit-and-pull step, not from anything fancy with the shaping after. Once each strip is braided, just roll it up with the braid facing outward and set it in the pan that way. The oven does the rest.
Back to top ↑Like baking with starter you'd otherwise discard?
More Discard Recipes