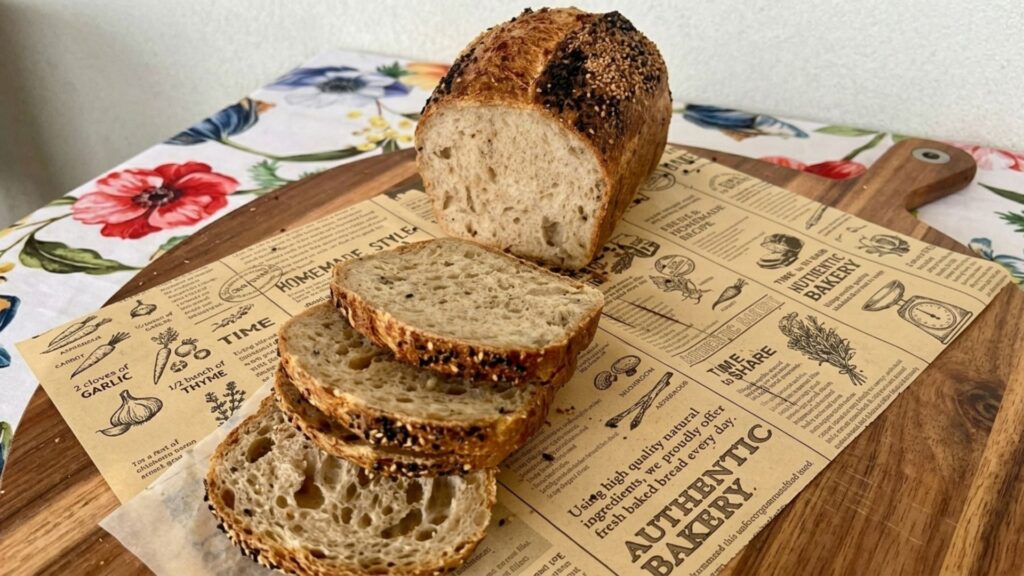
Not every loaf needs a trip to the fridge. This one skips the cold proof completely and still gets you a soft, seeded sandwich bread by the end of the day.
I keep this recipe for the days I want fresh bread but didn't plan two days ahead for it. Mix in the morning, shape after lunch, slice it warm for dinner.
In This Post
Why This One Skips the Fridge
Most of my loaves get a long cold proof overnight, and that slow, cold rest is where a good part of the sourdough tang builds. This one trades that tang for speed. It stays at room temperature the whole way through, so the flavor comes out milder and more mellow, closer to a classic sandwich loaf than a tangy sourdough.
That's the trade you're making here, and on the days you want bread today instead of tomorrow, it's a good one. If you'd rather have the fuller, tangier version and don't mind planning a day ahead, my go-to plain sourdough loaf is the one I'd point you to instead. Same starter, same basic method, just a night in the fridge added back in.
What You'll Need
Ingredients
- 270g bread flour
- 80g whole wheat flour
- 80g active sourdough starter
- 250ml water
- 20ml olive oil
- 20g honey
- 7g salt
- 10ml water, reserved for the salt
- 20g mixed seeds, for rolling
Mixing and Bulk Fermentation
Mix everything except the salt, holding back 10ml of water from the total. Let it rest 30 minutes, then work in the salt along with that reserved water. Holding it back this way makes it easier to get the salt fully incorporated once the dough has already come together.
From there, one set of stretch-and-folds, then two sets of coil folds spaced 30 minutes apart. The seeds go in during the second set of coil folds, folded right into the dough. Bulk rise runs about 8 hours at room temperature.
🌡️ Watch your kitchen temperature
This timing is based on a dough sitting around 20°C (68°F). A warmer kitchen will move things along faster, a cooler one will slow it down. Look for the dough to be visibly risen and a little puffy rather than watching the clock.
Shaping and the Seed Coat
Shape the dough into a tight log. Mist the top with a little water so the seeds have something to grip, then roll it in the mixed seeds before setting it seam side down in the loaf pan. Give it 2 hours on the counter to puff up before it goes in the oven.
Baking the Loaf
No Dutch oven needed for this one. An inverted loaf pan set on top does the job as a lid, trapping steam for the first 20 minutes at 230°C (450°F) in a static oven. Then lift the lid off, drop the temperature to 210°C (410°F), and bake another 20-25 minutes until the crust is deep golden and the loaf sounds hollow when you tap the bottom.
🍞 Good to know
This loaf is milder than a cold-proofed sourdough, which makes it an easy one to bring beginners toward. If you're new to sourdough baking, this is a forgiving place to start.
Step-by-Step
- Mix. Combine flours, starter, water (minus 10ml reserved), olive oil, and honey. Rest 30 minutes.
- Add salt. Work in the 7g salt with the 10ml reserved water.
- Stretch-and-fold. One set, then rest 30 minutes.
- Coil fold, first set. Rest 30 minutes.
- Coil fold, second set. Fold in the mixed seeds during this set. Rest 30 minutes.
- Final coil folds. Let bulk fermentation continue to about 8 hours total at room temperature.
- Shape. Shape into a log, mist the top with water, and roll in the remaining mixed seeds.
- Bench rest. Place seam side down in the loaf pan, rest 2 hours on the counter.
- Bake, covered. 230°C (450°F), 20 minutes, using an inverted loaf pan as a lid, static oven.
- Bake, uncovered. Drop to 210°C (410°F), 20-25 minutes, until golden and hollow-sounding.
Keep in mind this is the fast version. It won't have the tang of a cold-proofed loaf, but it slices clean for sandwiches and toasts beautifully the next morning, if it lasts that long. Good bread doesn't always need a plan two days out. Sometimes it just needs a morning.
↑ Back to topTry it, and tell me how it goes, good or ugly, I want to see it.
See More Recipes